June 2015 |
 |
|
|

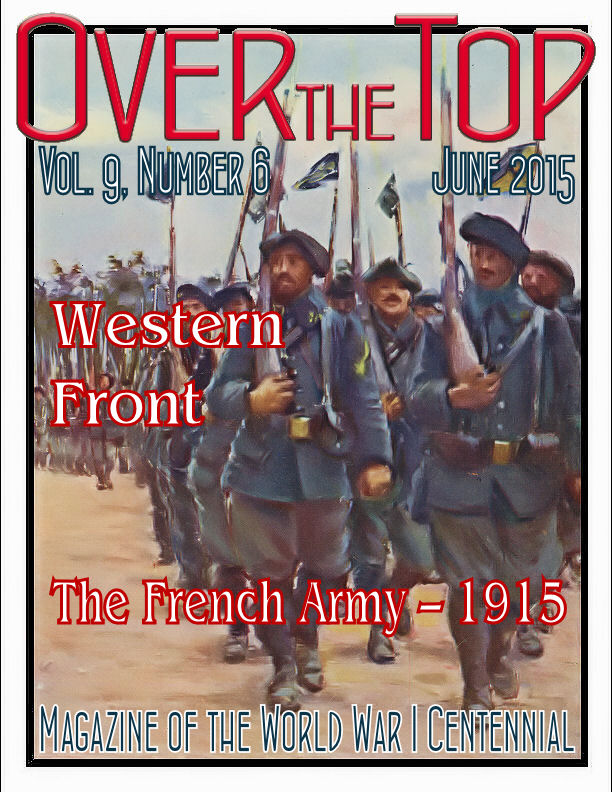
Western Front Trip Report
I've just returned from leading my first Centennial battlefield tour of the year. It covered the late 1914 and 1915 sites from the Channel to the Somme. My thinking was that I would share all of my highlights of the tour with the readers, but when my list grew to 17 items I decided to scale it back to the top five. So here they are in tour sequence. 1. A full exploration and briefing on the siege of Antwerp by our contributing editor and Antwerp resident, Tony Langley. 2. A comprehensive reconnaissance of the inundated area from the Nieuport locks to Diksmuide that secured the Western Front's north flank for four years. 3. My first visit to the vastly improved In Flanders Field Museum in Ypres, which is now "world class" (readers may remember I was very critical of its pre-2012 manifestation.) 4. Driving to the top of the Double Crassier at Loos (I couldn't believe it could be done, see below.) 5. Discovering that the Race to the Sea sites of 1914 in the Somme sector corresponded almost exactly to the jump-off line of 1 July 1916. Anyway, it was a great trip and you will be seeing photos from it in future editions of the Trip Wire and our daily blog Roads to the Great War. MH

Atop the Double Crassier, Loos
|
|
2015
Defeat at Gallipoli: A Tragedy in Four Acts, Presented by Your Editor, Mike Hanlon
When: 1:00 P.M., Sunday, 31 May 2015
Where: 828 I St, Sacramento, CA
Sponsor: Sacramento Public Library
The Original Veteran: World War One Doughboys
When: 3 June 2015, 7:30 pm
Where: Pennsylvania Military Museum, Boalsburg, PA
Sponsor: Friends' Richard Koontz Memorial Lecture Series (Details)
Spring 2015 World War 1 History Symposium, Full-day Event
When: 8:30 A.M. - 4:00 P.M., Saturday, 20 June 2015
Where: Maryland War Memorial Building, Baltimore, MD
Sponsor: WFA East Coast Branch, Click HERE to download the program.
Remembering the Great War: A Symposium on World War I
, Full-day Event
When: 9:00 A.M. - 4:00 P.M., Monday, 22 June 2015
Where: Department of Archives and History 624 Washington Avenue, Montgomery, AL
Sponsor: Caroline Marshall Draughon Center, Auburn University, Alabama Department of Archives and History, and the Croix Rouge Farm Memorial Foundation, Click HERE to download the current list.
|
Local and Ongoing Events
The interest in the Great War generated by the Centennial commemorations has led to an explosion of local events and ongoing displays of art and artifacts from the war. We simply lack the space here to include them all. Fortunately, however, the staff of the Centennial Commission has taken on the job of providing a list of all these presentations they hear about. Click HERE to view the current list.
|
Battle of Heligoland Bight
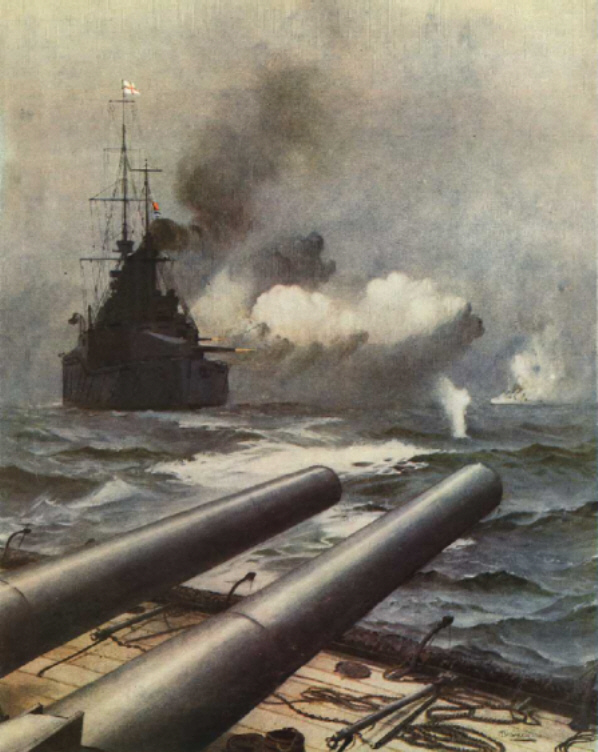
HMS Lion Opens Fire in First Naval Battle of
the War, 28 August 1914

International World War I Centennial Resources
Centennial Commemorations around the world have generated a wealth of new resources for students and researchers of the Great War. Here are links to several with their countries of origin. They are, naturally, usually presented in the home language of the organizers.
 Picture Postcards from the War (Germany)
War Letters Home (Canada)
Clandestine War Press (Belgium)
Documents of the Great War (Italy)
Serbia and the War
National Archives, Military Resources: World War I (USA)
Virtual Exhibition on the Gallipoli Campaign (Australia)
BDIC Commémore la Grande Guerre (France)
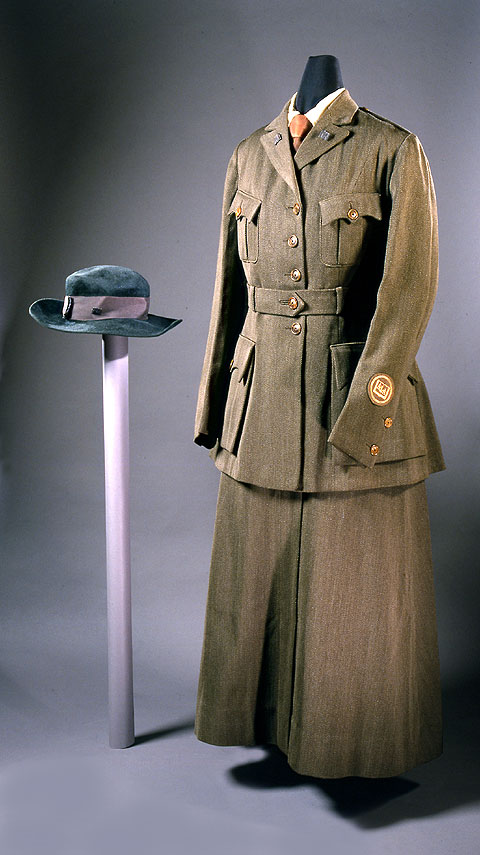
Mystery
Uniform
Who would have worn this uniform during the First World War? (Answer Below)

When we tumbled in, I fell on top of some of the enemy, and one put his teeth in my cheek and held on.
I was dragged close to him, but my arms were
free, and I tried to get my thumbs into his eyes
and push out his eyes, but found his throat
instead, and squeezed his windpipe. I felt my
cheek being released, and my enemy struggled
no more. Immediately I grabbed my rifle and
clubbed him with the butt.
R.M. Luther, RFA, 20th Division,
Memoir, The Poppies Are Blood Red
|

|
U.S. Centennial Organizations & Resources
worldwar-1centennial.org/
theworldwar.org/
www.ww1-centennial.org/

history.army.mil/
www.firstdivisionmuseum.org/

www.abmc.gov/

www.overthefront.com/

www.nationalmuseum.af.mil/
www.worldwar1.com/dbc/
facebook.com/wwiinventory

wisconsinhistory.org/

www.uswarmemorials.org/
www.macarthurmemorial.org/

www.saving-hallowed-ground.org/
www.theprgroup.org/
Support Our Centennial Effort
Shop at Amazon.com
|
The Centennial Ticker
National Memorial Design Competition Underway

On 21 May 2015 the National WWI Commemoration Commission released details on the competition for the design of the National Memorial for the war. Below is a summary of some key points for our readers. Complete information on the Memorial Design Competition with a number of helpful downloads, including the competition manual can be found at:
http://worldwar-1centennial.org/index.php/competition-overview.html
Memorial Site

As previously announced, the site for the National World War I Memorial is at Pershing Park in Washington, DC. It is a 1.8-acre parcel bounded by Pennsylvania Avenue NW on the north and south, 15th Street NW on the west, and 14th Street NW on the east.
Eligibility for the Design Competition
Stage I of this Design Competition is an open, international competition, open to any professionals, university-level students, or any other interested participants who register and pay the required submission fee. A participant may be an individual, a team of individuals, or a firm.
Schedule
The schedule is very ambitious. The first stage submittals are due by 21 July 2015. The final selection of the design and design team will be in January 2016.
Design Goals for the National Memorial Include:
1. Pershing Park will be a national World War I Memorial, in contrast to today�s park that only incidentally includes a small memorial to General Pershing and the American Expeditionary Forces under his command.
2. The Memorial should honor the heroism and valor of the American servicemen and women who served, fought, and died in World War I, and should commemorate the tragedy and magnitude of loss suffered by the United States in the conflict.
3. The Memorial should be timeless and meaningful for future generations, which can be achieved through appropriate interpretive elements including (but not limited to) figurative or other sculpture, traditional monument forms, and relevant quotations or other texts relating to American participation in World War I. The Memorial shall not list names of individual servicemen and women who served or were killed in World War I.
Additional key points: The Memorial should be designed primarily as open space; buildings or indoor spaces are strongly discouraged. . . the Memorial should be designed to be constructed at a cost no greater than $20-25
million . . .
The American Battle Monuments Commission's Student-Teacher Materials

Typical Chapter Opening Page
The American Battle Monuments Commission in conjunction with the University of North Carolina-Chapel Hill (UNC) and Virginia Tech (VT), and with support from the World War I Centennial Commission, has just released Bringing the Great War Home: Teaching with the Meuse-Argonne American Cemetery, a free World War I Teacher�s Guide. There are ten chapters now available for downloading at the url below. Each is a multi-media hybrid with a base pdf document that integrates video and PowerPoint presentations to supplement its text and images. Since these were developed by teachers for teachers' use in classrooms, there is a considerable amount of material on methodology running through some of the chapters. However, there is some terrific substantive material that I've not seen available elsewhere, and I'll focus here on a couple of examples.
For the full series go to:
http://www.multivu.com/players/English/7062153-abmc-great-war-teacher-guide/
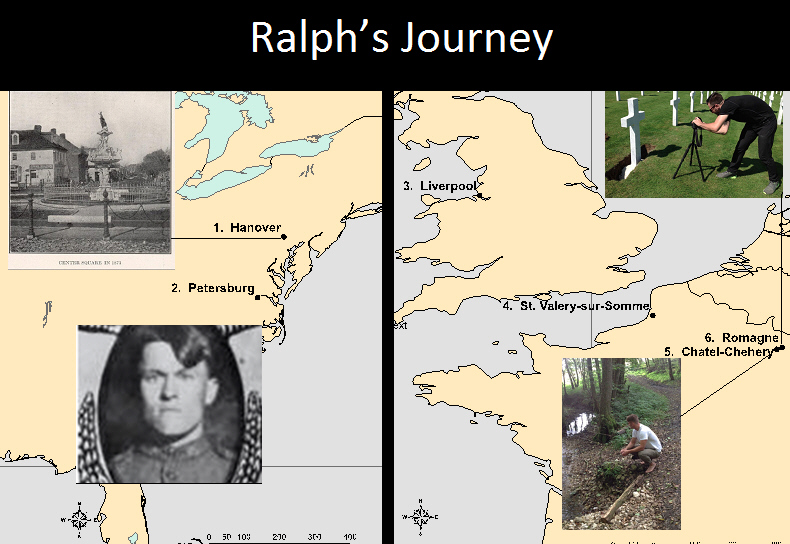
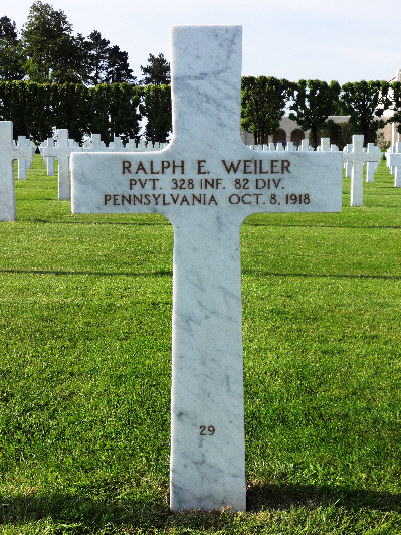
Pvt. Ralph E. Weiler, 328th Infantry, 82nd Division
In the chapter "Out of Isolation: From Home to Hell — The Journey from America's Cities and Farms to European Battlefields" by teacher Jared Morris, the story is told of a single American soldier who served and died in the war. He was Ralph Weiler from Hanover, Pennsylvania. The narrative follows him from the age 14 in his hometown, to receiving his draft notice, to fighting in the Meuse-Argonne Offensive, to his death in an action near the village of Chatel-Chéhéry, and his burial at the American cemetery at Romagne.
The Corrected Marker
|
In an interesting postscript, in researching Ralph's story for the teachers' guide, the project team discovered that his name had been misspelled on his original cross. So the replacement of his original grave marker gave the opportunity to present details on how they were designed and then inscribed for each soldier. Images of the huge field of crosses at the Meuse-Argonne Cemetery help make the point that Ralph's story was just one of tens of thousands that could be told.
When you read this chapter yourself, I think it will be evident that the team that produced this work understood how to reach young people and touch them emotionally.
Download the full chapter at:
Target="_blank">http://www.abmc.gov/sites/default/files/curriculum/chapters/Out%20of%20Isolation.pdf/
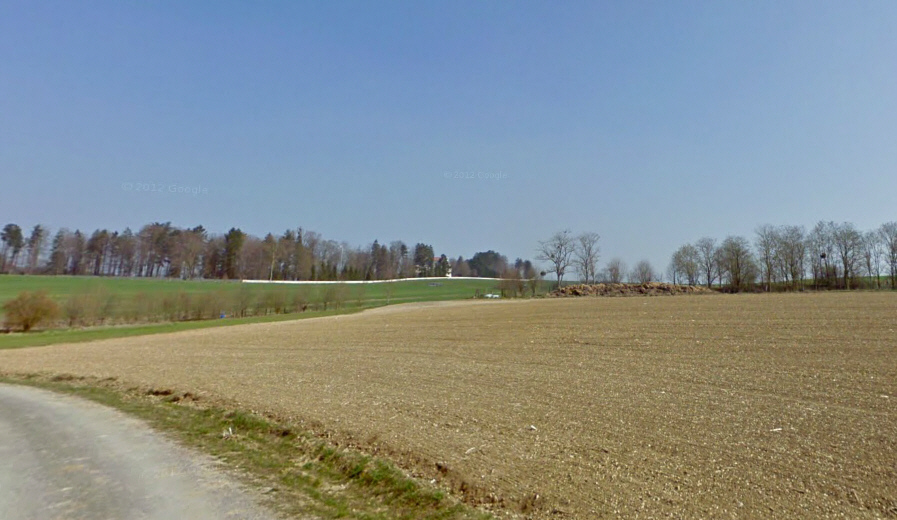
The Hindenburg Line of 1918 Viewed Today
Another excellent chapter, "World War I Through the Eyes of the United States Soldier," is narrated by Teacher Bill Melega. Bill actually walked-the-walk of the troops who advanced in the Argonne action, visualizing what the men faced in the battle and then describing it for us. Here is part of his observations about the site shown above, which in October 1918 was one of the strongest German positions on the Western Front. This took my breath away when I read it:

Teacher Bill Melega
Tells Us What the
Doughboys Saw
|
North of Chambronne Creek — End of October. This is where the American advance would get to, facing what we call the Hindenburg Line. Known as the Kriemhilde Stellung to the Germans. . .You�re now within not only deadly rifle range, but also artillery and mortar, getting ready for one more no-man's-land. The safety of the woods are left behind, you now have to cross no-man's-land into the heart of the monster to end the war. I think this, more than anything, will exemplify the U.S. soldier's experience. As you come out of the woods . . . this hilltop, running cross the ridgeline to where you see the roof of the chapel to behind it, [these] heights of Romagne, this is the interconnected high point. This is where the German's had dug in their strongest defenses. . . So as the United States soldier, not digging trenches, not digging fox holes, his task as we walk in his footsteps — what I want you to understand — is to cross no man's-land, as far as you can see, following that ridgeline and these woods here, this is the American soldier's no-man's-land. Much bigger than those of his British and French allies. This is what he saw, standing at exactly where he stood, looking at exactly what he saw. Just over the rise there lies the cost, nearly 15,000 U.S. soldiers [at America's Meuse-Argonne Cemetery].
Download the full chapter at:
http://www.abmc.gov/sites/default/files/curriculum/chapters/Looking%20at%20the%20Meuse-Argonne.pdf
Uncle Sam's WWI Centennial
Needs You!
California Outreach Head
Courtland Jindra
|
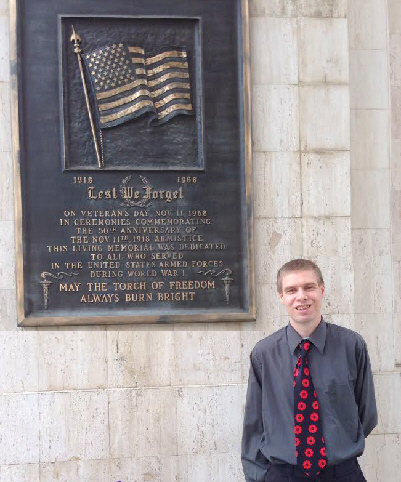
You have a chance to make a difference. For the successful commemoration of America's First World War effort, enthusiasts for every aspect of our history need to join in. You can volunteer to help out at the national, state, or local level. There are jobs that need to be done and jobs that are yet to be discovered. Take the example of my friend Courtland Jindra on the right. He's shown here at one of his "gigs" telling visitors to the Los Angeles Coliseum about its WWI heritage and status as a war memorial. On his own initiative, Courtland has also helped with the recent Anzac Day commemoration and at restoring Great War monuments needing repair in the Southern California area.
If you have an idea for the commemoration or would be willing to step in help the Centennial Commission, email Meghan Gallagher of the Centennial Commission at:
meghan.gallagher@worldwar1centennial.org
|
|

The First Battle of the Isonzo on the Italian Front Opens
23 June 1915

Isonzo River Viewed from the Austro-Hungarian Defensive Position
On 24 May Italian fortresses on the perimeter of the Asiago Plateau fired the first shots of the war on the new front. Supreme Commander Luigi Cadorna mounted a surprise opening offensive, known as Primo Sbalzo [the First Jump], in late May 1915 to improve his army's position in selected sectors. In northeast Italy he ordered an advance across the 1866 border to the banks of the Isonzo. The Second Italian Army under General Frugoni captured Caporetto [Kobarid] in the north and the mighty peak of Mte Krn [Mte Nero] beyond the Isonzo. In the south the Duke of Aosta's Third Army also advanced, but war confronted by enemy units deployed across the river before Gorizia and on its surrounding mountains, thus preventing a quick capture of that key city. It was only in this last sector, however, that Italian territorial ambitions — their sole reason for joining the Allies — could be fulfilled.
The 60- mile-long valley of the Isonzo [Soca] River running from the Julian Alps south to the Adriatic Sea bisected the only practical area for offensive operations by the Italian Army during the Great War. Throughout most of the rest of the mountainous 400-mile length of the S-shaped Italian Front the dominating positions almost everywhere were in the hands of the Austro-Hungarian forces. A Delimitation Commission following the war of 1866 had intentionally given Austria a highly defensible frontier. But by attacking across the coastal plain east of the lower end of the river, they could, so judged Cadorna, feasibly acquire a series of territorial objectives from Gorizia to Trieste down to the Dalmatian Coast. Secondarily, further to the North they believed they could leapfrog the mountains bracketing both sides of the River and strike a strategic blow against their opponent's rear.
The Isonzo sector, however, presented its own difficult obstacles. The river itself was susceptible to flooding and the war years featured record rainfalls and snow melts. In the more mountainous northern sector of the Front the Italian high command confronted a dilemma they never managed to resolve: To cross the river successfully, they needed to neutralize the forces atop the overlooking mountains; but to occupy those mountains, they had to cross the river first. The lower coastal zone seemed to present more possibilities for advancing, but it featured some peculiar geography that aided defending forces — a plateaued howling wilderness between Gorizia and the Adriatic, known as the Carso.
These disadvantages combined with the Italian determination to achieve their expansionist war aims plus the defensive skills of General Borojevic von Bojna, commander of the Austro-Hungarian Fifth Army, would turn the Isonzo into one of the greatest killing zones of the First World War. Italy would suffer half of their 600,000 killed and Austria-Hungary would suffer 200,000 of its WWI total of 1.2 million dead along the Isonzo. Italian soldier and poet Giuseppe Ungaretti would later write: "The Isonzo scoured me like one of its stones."
Four battles would be fought on this front in 1915, five in 1916, and two in 1917.The First Battle of the Isonzo would begin with a week-long artillery barrage from General Cadorna's forces on 23 June 1915.
The fighting began in similar fashion to the French and British attacks of early World War I on the Western Front with an inadequate, week-long artillery barrage the length of the front. Some early successes were achieved. However, the inability to drive the Austrians from the rest of the high ground west of Tolmino and the river would one day haunt the Italian Army as this bridgehead would be the launch pad for the catastrophic Caporetto Offensive by the Central Powers. For a few short hours the Italians were able to advance far enough to look down into the streets of Gorizia, but were eventually beaten back. On the Carso they gained small footholds at Adgrado and near Redipuglia and little else.
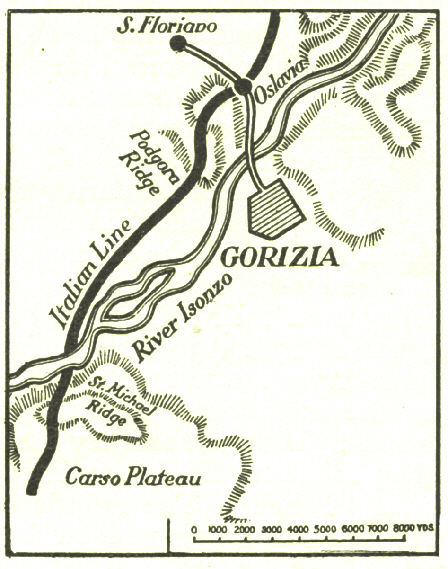
Opening Position for First Battle of the Isonzo
After failing to make any other significant progress, Cadorna halted on 7 July. He realized his artillery was inadequate and he was further hindered by a chronic shortage of shells which was never to be resolved. Thus, besides his own flawed strategic thinking, ordnance problems would also limit the offensive capabilities of his armies throughout the war. Nonetheless, he would order three more offensive operations along the Isonzo in 1915.
Source: La Grande Guerra Website
|
|

Announcing Our 2016 Centennial Tour Schedule
Verdun and the Somme In-Depth
On behalf of Valor Tours, Ltd. I am happy to announce that I will be leading two tours for the company next year —
2 - 10 May 2016: Verdun In-Depth
14 - 21 August 2016: The Somme In-Depth
The full brochure covering both trips and registration details can now be downloaded at: (http://www.worldwar1.com/pdf/ValorTours_2016Flyer.pdf)
Bookings are still available for our last trip of 2015 to the Western Front:
15-23 August 2015: My summer Centennial expedition will cover the Western Front Battles of 1914 and 1915 East of Paris in the Chemin des Dames, Champagne, Argonne, and St. Mihiel sectors, PLUS the American Battlefields of 1918 at Château-Thierry, Blanc Mont, St. Mihiel, and the Meuse-Argonne.
Western Front & AEF 2015 Tours
|
|
|

|

Armies of the Great War
An Important New Series from Cambridge University Press
Military Policemen of Six Armies at Salonika
Cambridge University Press has taken on the job of solving one of my major complaints about World War One history that is accessible for readers who wish to get beyond the signature battles of the conflict like the Marne, the Somme, Verdun, and Passchendaele. Their new series on the armies of all the major participants is a big step in the right direction toward resolving this.
For instance, past readers of the Trip-Wire may recall that my list of major gaps in what is available in English on the war includes the French battles of 1915 on the Western Front, particularly the battles in Artois and the Champagne. Luckily, the first set of four works in the series includes a volume on the French Army by Australian Historian Elizabeth Greenhalgh and her chapter on the 1915 campaign corrects that deficiency. I was so impressed with her work that I requested permission from her publisher to present that section in our subscription magazine Over the Top this month.
More volumes are planned for the series (Serbia and Austria-Hungary for example), but here is what is available right now for purchase. These works are all written by highly qualified historians and cover the full range of issues affecting the war efforts of each combatant: diplomacy, strategy, operations, weapons, and tactics.
|

Live and Let Live
|
[Editors note 1. This is an article I ran across recently. It's very informative, but seems to me that it assume that uniform anti-war, defeat-the-high-command, and solidarity with fellow proletariat of the enemny predominated in the front lines throughout the war.]
The General Staff issued orders and directives
to its soldiers at a prodigious rate. Rather than
revealing that soldiers were not performing
their duties, this demonstrates the desire of
the authorities to control the soldiers'
behavior. It must be remembered that
Britain�s army in the Great War was composed
largely of the working classes from the most
hierarchical and deferential industrial society
in the world. . .

Scottish Soldiers, Typical of the British Troops in the Early War
The General Staff and the political powers, who acted to continue the war and command the soldiers, felt the soldier must be considered as an agent. Following this, it can be seen that some soldiers rejected the war outright: M. Ward wrote in December 1915, that he did "not want to see any more
fighting or hear any more shells coming over."
This rejection has been described by Tony Ashworth
in his analysis of how soldiers were
able to control and radically alter their
situation, reducing the danger within their
surroundings. This was accomplished through
the "live and let live" policy, described by
Blunden as one of the "soundest
elements in trench war." Live and let live was
defined as a truce in which enemies stopped
fighting by agreement for a period of time. R.J.T. Evans (LC) in a letter dated November 1915 illustrates this
when he wrote that whilst in a trench German
soldiers called out, "you no shoot, we no shoot."
Relieving troops moving into the front line
were able to take on the trench and possible
truce, and acquaint themselves with the
potential hazards in the area. This is illustrated by A.J. Abrahams�s memoir which described such a manoeuvre,
when soldiers would enquire about the
attitude in the area by asking, "any shit about?"
This exchange of ideas was also enabled by the
architecture of the trenches. The transverse structure of the trenches, which was designed to prevent enfilading fire along the whole length of the trench, also acted
to group men together along a line. Usually these positions were held by a small group of soldiers from the same section
performing a tour of duty. This distribution allowed the soldiers, to some extent, to avoid surveillance by the
commanding officer, which facilitated the live
and let live principle, as well as encouraging
the communication between men of attitudes,
actions, and principles.
Some junior officers may have also connived in this policy of sociability and of keeping aggression to a minimum. Live and let live was therefore a refusal of the values and outlook dictated by the military hierarchy and it alleviated the violence and danger in the landscape, altering the "space of death" within it.
by ROSS WILSON
From: "Archaeology on the Battlefields: An Ethnography of the
Western Front"
Published in Assemblage 11 (2011): 1-14
French Troops Just Trying to Have a Meal
[Editor's note 2. For my two cents worth, I think it might have been more related to practical matters and involved tacit understandings rather than communications between the troops. For instance, if the other side was bombarding your ration parties as your dinner was being brought up and you were going hungry as a result, the opposition was damn well not going to get fed either.]
|
|
|

Gully Ravine at Helles: Missed Opportunity and
High-Water Mark
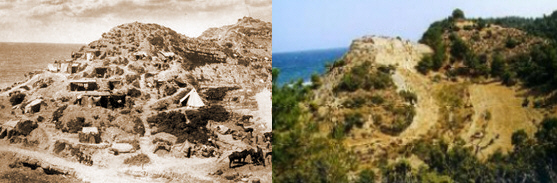
Entrance to Gully Ravine, 1915 and 2009
On Omaha Beach in Normandy there are five cuts or
draws that were the keys to U.S. forces exiting the beach
on D-Day in 1944. The Gallipoli peninsula has similar
features, called "gullies" that run from the Cape Helles and Anzac sector beaches to the higher ground inland. Some gullies
at Gallipoli are deep enough to allow troops to advance
unseen by enemy forces above them on either side.
In both areas these are concentrated on the Aegean side of the
peninsula, away from the straits. At Helles, the deepest of these — 30 meters at some points — and the most complex with smaller cuts radiating off its main branch is known, somewhat redundantly, as Gully Ravine.

Advancing North, Gully Ravine Is Progressively Deeper
Its entrance is off a beach located between Y and X beaches (see map below) that was designated as Y2 when it was considered as a landing site. It runs nearly 5 km directly within half a kilometer of Krithia, the initial objective of the Helles landings.
Gully Ravine was significant twice over during the campaign. On the day of the landing it represented the greatest missed opportunity for a quick knockout blow against the modest, but effective, Turkish forces defending the landing zone. Two thousand troops from three battalions sent to supplement the 29th Division landed unopposed at Y Beach the morning of 25 April. The rugged terrain and a confused command structure kept them from organizing and advancing. One of the battalion commanders, however, discovered Gully Ravine and to his surprise found he was able to view the main objective, Krithia, from Gully's terminus. But a belated decision was made locally to dig in around the beachhead, and shortly afterwards Turkish troops arrived on the scene and attacked immediately. The British forces incurred very heavy casualties, and within 24 hours the beach required evacuation. The opportunity had passed.
The Allies would never
advance as close to their first-day objectives again.
Once both sides discovered the strategic value of Gully
Ravine it became the site of constant attacks and
counterattacks throughout the Helles campaign. It even
gave its name to one of the final actions in the sector.
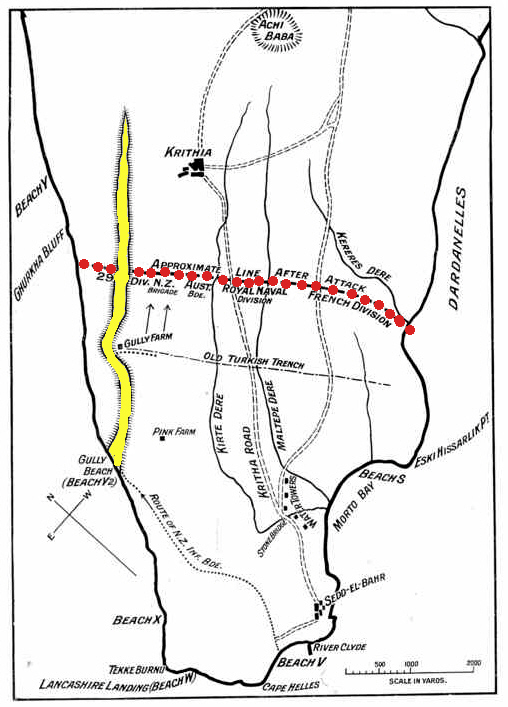
Gully Ravine in Yellow, Farthest Advance of the
Entire Campaign in Red
In late June, in what came to be known as the Battle of
Gully Ravine, the 29th Division, supplemented by Indian
troops and a brigade of the newly arrived 52nd
Division, mounted a limited attack toward Krithia. An
advance of 1 km was made despite ferocious counterattacks
by Turkish troops. It was the high-water mark
of the otherwise failed Helles campaign. After the battle, the high command gave up on any advance from Cape Helles. The first-day objectives of Krithia and Achi Baba were simply unattainable. The main invasion site of the original invasion would simply serve as a diversion until the end of the year, when its evacuation began.
|
|
Uniform Trivia Answer: a female volunteer for the American Library Association. (Photo from the Smithsonian collection)
Thanks to each and every one of you who has contributed material for this issue. Until our next issue, your editor, Mike Hanlon. |
|
(Or send it to a friend)
|
Design by Shannon Niel
Content © Michael E. Hanlon
|
|
|