
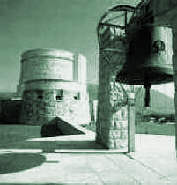
Ossuary and Memorial
Oslavia
|
THE ISONZO
1915
|
Overview
In 1915 the opposing commanders on the Isonzo Front each seemed to understand a single, but different, principle of warfare to the exclusion of all others. The Italian Comando Supremo dominated by Luigi Cadorna applied the Principle of the Offensive -- that only through offensive action can decisive results be achieved -- to all their strategy. In a half-year they would mount four major attacks against their foe.
Facing them, General Boroevic practiced the Principle of Simplicity to the maximum. His strategy was strictly defensive and he issued only one directive: "The troops should construct positions, place obstacles in front of them and remain there." Given his highly defensible position -- one requiring river crossings and assaults against high mountains by his enemy -- this approach kept the General, known to his troops as the Croation Thickhead, out of trouble at first. It was, however, a tribute to the determination of the individual Italian soldier and the willingness of his leaders to spill his blood that by the end of the year, Boroevic's Fifth Army was just barely holding on to its position, requiring reinforcement by twelve divisions from other fronts.
Indeed, the Austrians also had the utter exhaustion of their adversaries to thank for surviving 1915. While Cadorna remained true to that single Principle of the Offensive, he repeatedly demonstrated ignorance of two other important, complimentary Principles:
Mass - Applying the maximum combat power at the point of decision; and
Economy - Applying the minimum essential means at points other than at the point of decision.
In 1915, the Italian commanders attacked positions up and down the sixty mile long Isonzo Front. By attacking everywhere, they were unable to concentrate 'Mass' anywhere and they physically and emotionally enervated their own forces. Their assaults were almost always uncoordinated, often piece-meal and usually mounted with inadequate artillery fire to back the infantry. Also, since the Austrians often occupied the higher positions the attacks usually failed to surprise them since they had been watching the preparations all along. As a result, in about six months Italy's Second and Third Armies would suffer 250,000 killed, wounded and captured along the Isonzo. The areas of operations shifted widely for each of the year's four major battles, but heavy casualties and a lack of notable progress characterized all of them.

First Battle of the Isonzo
June 23 - July 7, 1915
The battle began in similar fashion to the French and British attacks of early World War I on the Western Front with an inadequate, week-long artillery barrage the length of the front. Some early successes were achieved. The massif of Monte Krn [Mte Nero] was partly occupied, the heights around Plezzo in the North were captured and Mte Colowrat opposite Tolmino was also taken. However, the inability to drive the Austrians from the rest of the high ground west of Tolmino and the River would one day haunt the Italian Army as this bridgehead would be the launch pad for the catastrophic Caporetto Offensive by the Central Powers.
Between Gorizia and the sea, the Austrians withdrew to the east across the river. Gorizia itself, however, was defended on the west side of the river with Podgora and Oslavia turned into bastions and further supported by a surrounding ring of mountains, most importantly, Mte Sabatino to the north and by the Carso plateau to the south. At Podgora fighting assumed the inferno-like character of Verdun with vicious street fighting amidst artillery barrages. For a few short hours the Italian Re and Casale Brigades were able to advance far enough to look down into the streets of Goricia, but were eventually beaten back. On the Carso they gained small footholds at Adgrado and near Redipuglia and little else.
After failing to make any other significant progress, Cadorna halted. He realized his artillery was inadequate and he was further hindered by a chronic shortage of shells which was never to be resolved. Thus, besides his own flawed strategic thinking, ordnance problems would also limit the offensive capabilities of his Armies throughout the war.

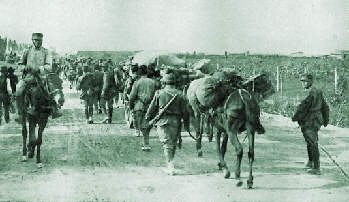
Austrian Troops Approaching the Isonzo
Second Battle of the Isonzo
July 18 - August 3, 1915
Fighting intensified when offensive operations resumed in July. Austro-Hungarian forces started absorbing their own heavy casualties incurring 45,000 killed and wounded in a single month. Combat at the bridgehead sectors around Plezzo and Tolmino resummed and became scenes of nearly continual struggle transcending the official dates of the Isonzo battles. The advesaries engaged in hand-to-hand combat on the plateau of Mte Krn. [See photo on 1917 page.] The battle for Podgora, front door to Goricia, was resummed with a vengeance. Eventually the town was captured by the 6th Corps of the Italian Second Army after a tremendous artillery barrage.
It was during this battle that the Carso started to gain its fearsome reputation. One Austro-Hungarian unit, the 20th Honved Division was broken losing two-thirds of its men. On July 25th, Mte San Michele [more a hill than a mountain but commanding the local terrain] became a focal point of fighting. A collection of Austrian regiments known as the Richter Group (after the Colonel commanding) would become part of the war's mythology by mounting a suicidal counter-attack here. After three weeks, with ammunition running low, the fighting died out with little changed.

Typical Section of the Isonzo North of Goricia
Third Battle of the Isonzo
October 18 - November 3, 1915
The brutality of the fighting escalated even further with the Third and Fourth Battles of the Isonzo. General Cadorna was now looking for The Big Breakthrough, but continuing his neglect of the Principle of Mass he committed forces the length of the Front once again. He did try to narrow his areas of attack in each region and raised his artillery count to 1,200 guns, but once again, he spread his forces too thin for what he hoped of them.
Efforts to reduce his enemy's bridgeheads at Plezzo and Tolmino were ordered leading to innumerable, but indecisive, actions in those areas. Other attacks were mounted against Plava on the south edge of the Bainsizza Plateau. Also, the Carso heated up once more as St. Michele became the keystone to a flanking move on Gorizia. Nearby Monte Sei Busi, defended ferociously by the Austrian 106th Division, was the scene of at least four major assaults. Attacking on narrower fronts, though, meant the Austrians could focus more of their firepower over smaller sections. Boroevic also started receiving additional divisions from the Eastern and Balkan Fronts and staged some ferocious counterattacks against the Italians around Ste Michele. In early November Italy's Comando Supremo ordered a temporary halt to reevaluate the situation.
Italian Troops Approaching the Carso
Fourth Battle of the Isonzo
November 10 - December 2, 1915
The Fourth Battle of the Isonzo was really a second phase to the Third Battle. Fighting was more, but not exclusively, concentrated around Gorizia and on the Carso. In the first case, the Second Army mounted its greatest assault capturing Oslavia, but with not quite enough momentum left to gain Gorizia. South down to the Adriatic, the Third Army simply accumulated more and more casualties. Typical, was the fighting around Mte Sei Busi where five more assaults were mounted by the Italian Army. Towards the end of the Fourth Battle, action heated up again up and down the Isonzo Front from Tolmino down to Mte San Michele reaching a peak at the end of November. From the 1st of December to mid-month action shifted from major frontal assaults to small local actions. Halting for the winter, the troops on the Carso would learn they had achieved little since June except exchanging the pounding sun of the summer for a crushing northern winter wind off of the Alps know as the Bora.
|

To find other features on La Grande Guerra visit our
Directory Page
|
For Great War Society
Membership Information
Click on Icon |
For further information on the events of 1914-1918
visit the homepage of
The Great War Society
|
Additions and comments on these pages may be directed to:
Michael E. Hanlon
(medwardh@hotmail.com) regarding content,
or toLeo Benedetti (leoben@silcon.com)
regarding form and function.
Original artwork & copy; © 1998-2000, The
Great War Society
|